 Prospecting and Intros
Stand out and improve response rates.
 Sales
SalesGenerate more pipeline and close more deals.
 Sales Support
Set your sales team up for success.
 Marketing
Host video content and convert viewers into leads.
 Converting and Closing
Connect with buyers and close more deals.
 Corporate Comms
Create and deliver an internal communications strategy.
See Vidyard in Action →
“Personalized Vidyard video messages drove an 8x improvement in click-through rates and a 4x improvement in reply rates.” Read More
 Blog
BlogThe secrets to virtual selling and video best practices.
 Video Agent Hub
Case studies and how-to videos for every revenue use case.
 Help Center
How-to and help articles for all things Vidyard.
 Fast Forward
Expert advice on all things virtual selling.
 Templates
Free sales templates for every stage of the deal cycle.
 Use Cases
Explore real ways to use video across your business.
 AI Resource Hub
Guides and ideas for using AI in your workflow.
 Case Studies
Learn how our customers win more with Vidyard.
 Live Workshop Series
Showing you exactly how to put video to work.


How to Screen Record on Your Computer & Mobile Device
Jan 31, 2024
·
10 min read

Chris Gillespie

Get step-by-step instructions for how to screen record on your Mac, Windows PC, Chromebook, iPhone, and Android devices.
Have something on your screen that you want to share, but not sure how to screen record on your laptop, PC, Mac, or mobile device? We’ve got you covered.
The good news is that most kinds of devices have their own built-in screen recording tools. Keep reading to learn:
- How to screen record on a Mac or Macbook
- How to screen record on a Windows laptop or PC (on Windows 10 and 11)
- How to screen record on a Chromebook
- How to screen record on iPhone
- How to screen record on Samsung and other Android devices
While these built-in screen recording tools are great for capturing basic video from your screen, you might need additional features (like the ability to record audio at the same time, or to edit your recorded footage). Check out our post on the best screen recorders.
Table of Contents
How to Record Your Computer Screen
So what is a screen recording? Simply put, it’s when you record a video of your device’s screen. This captures what’s happening on your screen and lets you share it with other people.
There are plenty of reasons why you might want to record your computer, phone, or laptop screen:
- A simple screen recording can be used to demonstrate how your product works to a potential customer.
- Running into a technical problem while working remotely? Use video capture to share it with your Dev or IT team.
- Need to teach a colleague how to do something, or onboard your new intern? Capture the workflow on your computer screen to make training easier.
- A hybrid screen recording (where you capture yourself and your screen) lets you build personal connections with prospects or share feedback with someone. You can even use it to save yourself from writing a long email.
When it comes to recording your screen, you can either use a built-in screen record feature (if your device has one), or download a screen recording software app or tool. Most built-in screen recorders can:
- Record video from your screen
- Record audio
- Save the video, either to your device or the cloud
Some screen recording software (like Vidyard’s Chrome extension and Vidyard for Desktop) goes further. It lets you capture a webcam video of yourself talking, displayed in a bubble alongside your screen recording, so you can add a personal touch to your footage.
How to Screen Record on Mac and Macbook
When it comes to recording your screen on your Mac, you’ve got options. You can use its built-in screen recorder, QuickTime, or third-party tools like Vidyard. We’ll walk you through each method below.
How to Screen Record on Mac and Macbook with the Built-In Screen Recorder
If you’re on macOS Mojave or higher, there’s a built-in feature for recording your screen, and it’s as easy as pressing a hotkey. (This is why people like Macs.) Here’s how to turn on the screen recorder:
- Press Command + Shift + 5.
- Select whether you want to capture the entire screen, a window, or a selection. (Otherwise, it’ll begin recording the entire screen automatically.)
- When done, press Command + Shift + 5 again, and click Stop.
- Your recording will appear as a thumbnail at the bottom right-hand corner of your screen. Click it to review it and choose where it saves.
How to Screen Record on Mac and Macbook with QuickTime
Alternatively, you can screen record with QuickTime, which is natively installed on all Macs. Here’s how:
- Open QuickTime.
- Select File, then New Screen Recording.
- Click the red Record button to start.
- To stop, click the Record button again.
- To save, click File, then Save.
Pro Tip: If you only need to save a screenshot on Mac, press Command + Shift + 4 and select the area you want to capture.
How to Screen Record on Mac and Macbook with Vidyard
While recording your screen with Mac’s built-in screen recorder or QuickTime can fill a lot of your needs, sometimes you need a few extra features to make that screen recording that really shines.
Vidyard’s browser extension lets you record your screen, as well as capture audio, show you speaker notes to reference during the recording, and insert a webcam bubble that shows your face. It elevates a simple screen recording into a professional-quality production. Here’s how to set up screen recording with Vidyard:
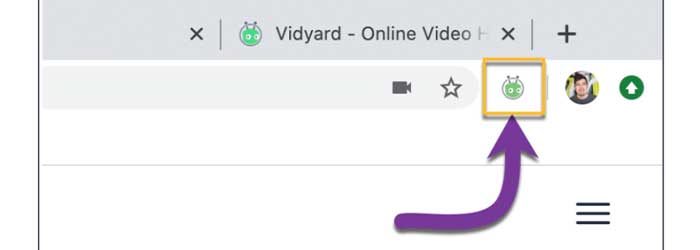
- Get the screen recorder extension on Chrome.
- Select the Vidyard extension in the upper-right corner of your Chrome window.
- Pick a recording type.
- Screen: Records your computer’s entire screen.
- Camera: Records a video using your webcam (a “selfie-style” video).
- Screen + Camera: Records both your screen and camera at the same time.
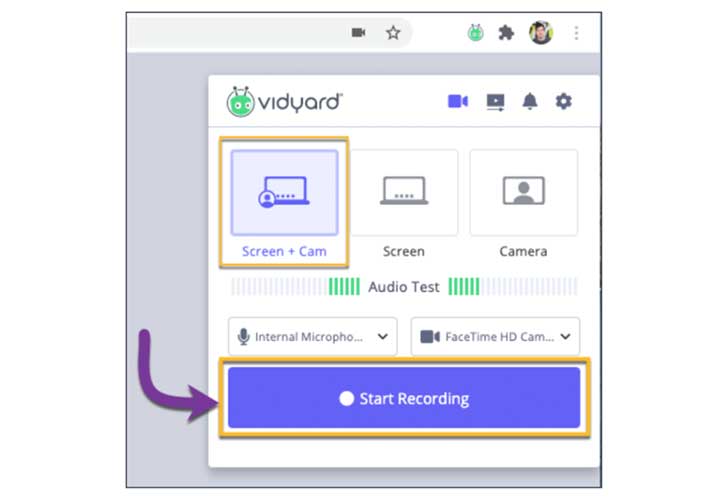
- Check the video and audio source drop-downs to make sure the extension is recognizing the right inputs.
- Make a little noise into your microphone and make sure the Audio Test bar lights up.
- Choose whether you want to add an Intro Banner or Speaker Notes.
- Intro Banner: Shows your name and title.
- Speaker Notes: On-screen notes that you can reference during recording. They won’t show in the final footage.
- Click Start Recording.
- When you’re done, click the Stop icon in the bottom-right.
- Follow the on-screen prompts to rename your video and copy its sharable link. People who click the link will be sent to the video’s dedicated landing page, where they can watch it.
Prefer to watch instructions instead of reading them? Here’s a video tutorial on how to screen record your Mac with Vidyard.

How to Screen Record on PC and Laptop (Windows)
How do you record your computer screen? While Windows 11 introduces a built-in screen recorder, if you’re still on Windows 10, you’re going to have to find another way to screen record on your PC or laptop.
Here’s a few options for how to screen record on Windows.
How to Screen Record on Windows 11
Microsoft built a screen recorder feature right into Windows 11. Here’s how to screen record on your laptop or PC:
- Open the Snipping Tool. (You can search for it in the Start menu.)
- Click Record, then New.
- Click Start.
- When you’re done, click Stop. Your screen recording saves into your Videos folder by default.
How to Screen Record on Windows 10 with Xbox Game Bar
There’s actually a great solution for screen recording in Windows 10 (with audio), and it should already be installed on your computer: Xbox Game Bar. Microsoft preloads it into Windows devices. It’s meant to record footage from video games, but it works perfectly well for recording anything else.
Here’s how to screen record with Xbox Game Bar:
- Type “Xbox” into the Windows search bar. Open the app.
- Hold Windows + G on your keyboard.
- Choose the Widget menu. In the Capture pane, click Start recording. (Or press Windows + Alt + R.)
- When you’re done, click Stop. (Or press Windows + Alt + R.)
Pro Tip: If you only need to take a screenshot on Windows 10, press Ctrl + PrntScrn, select the area you want to capture, and release.
How to Screen Record on Windows 10 with Vidyard
While the solution above is a good solution for recording your computer screen, there can come times when you have to screen record on Windows 10 without the Game Bar.
Tools like Vidyard fill this gap. Vidyard lets you capture your screen along with audio from your microphone. It also includes other features, like adding your webcam recording to your screen recording, and overlaying an intro banner to show your name and title. Here’s how to capture your screen on Windows with Vidyard:
- Add the Vidyard browser extension to your Chrome or Edge browser.
- Click the Vidyard icon in the upper-right corner of your browser window.
- Choose which type of recording you want to make.
- Screen: Captures your computer’s screen.
- Camera: Captures your webcam.
- Screen + Camera: Captures both your screen and your webcam.
- Set the right video and audio sources in the drop-down menus.
- Make some sample sounds near your microphone to see if the Audio Test bar lights up.
- Optionally, add an Intro Banner or Speaker Notes.
- Intro Banner: Displays a banner in the bottom-left corner that shows your name and title. (Both are customizable.)
- Speaker Notes: Load your talking points into the speaker notes. They’ll display on-screen while you’re recording so you can reference them, but they won’t be visible in the final product.
- Click Start Recording.
- When you’re ready to finish, click the Stop icon in the bottom-right.
- You’ll see a pop-up window showing next steps. Here, you can rename your video, and copy the link to the video so you can share it. Anyone who clicks the link will be able to watch your video on its own dedicated landing page.
Watch this video demo showing how to record your PC screen with Vidyard.
How to Screen Record in PowerPoint
Microsoft PowerPoint actually has a built-in tool that lets you screen record your presentations. Here’s how to use it:
- Open PowerPoint.
- Click the Insert tab, then select Screen Recording.
- Select the area you want to record. (To select the entire screen, press Windows Key + Shift + F.)
- Click the Record button (or press Windows + Shift + R).
- To end the recording, click Stop.
- You’ll see the video get added to the slide. To save it, right-click the frame, then select Save Media as.
How to Screen Record on Chromebook
Much like Macs and PCs, newer models have built-in screen recorders. However, if you’re looking for more in-depth recording functionality, you can install a third-party extension.
How to Record Your Screen with Chromebook’s Built-In Screen Recorder
Your Chromebook likely has a screen recorder built right in. Here’s how to use it:
- Press Shift + Ctrl + Show windows.
- In the menu, choose Screen Record.
- Choose how you want to record:
- Record your full screen
- Record your partial screen
- Record a window
- When you’re done, click Stop.
How to Record Your Screen on Chromebook with Vidyard
Vidyard’s Chrome extension lets you record and share videos straight from your web browser. (And it’s super easy to install.) Once you’ve installed it, here’s how to record your screen on Chromebook with the Vidyard extension:
- Select the Vidyard extension in the upper-right corner of your browser.
- Pick your desired recording type.
- Screen: Records your computer’s entire screen.
- Camera: Records a video using your webcam (a “selfie-style” video).
- Screen + Camera: Records both your screen and camera at the same time.
- Do an Audio Test to make sure your microphone is working. Make some sound into your microphone, and see if the bars light up. (To change the microphone or camera input source, use the dropdown menus.)
- Once you’re satisfied with the recording options you’ve selected, click on Start Recording.
- When you’re finished recording, click the Stop icon in the bottom-right.
Watch this video tutorial on how to take a video of your screen with with the Vidyard Chrome extension.
How to Screen Record on iPhone and iPad
If you’re looking to record the screen on your iPad or iPhone, there’s good news: They have a built-in screen recording feature. Here’s how to use it:
- Go to Settings, then Control Center, then Customize Controls. Tap + next to Screen Recording.
- Open the Control Center by swiping down from the top-right corner of the screen. (On older devices, you might have to swipe up from the bottom instead.)
- If you want to record audio, long press on the Record button, then tap Microphone. (If you’ve previously enabled your microphone, you can skip this.)
- Tap Start Recording.
- A red Recording bar will appear at the top of the screen. When you’re finished, tap that bar, then tap Stop.
- You can find your screen recording in your Photos app.
Pro Tip: Only need to take a screenshot on your iPhone or iPad? The process is a little different depending on your specific device:
- iPhone with a Home button: Hold the Home Button and press the Power button on the side of your phone.
- iPhone without a Home button: Hold the Lock and Volume Up buttons at the same time.
- iPad with a Home button: Press the top button and the Home button at the same time.
- iPad without a Home button: Simultaneously press the top button and either of the volume buttons.
How to Screen Record on Samsung and Other Android Devices
Android is pretty new to the screen recording game. Up until Android 11, the operating system didn’t include a native screen recorder. However, devices on Android 11 or later can find one built right in.
How to Screen Record on Android 11 or Higher
With Android 11 or above, there’s a screen recorder built right into the Android OS. Here’s how to use it:
- Access Quick Settings. (Swipe down from the top of your screen, then swipe down again.)
- Find the Screen Recorder option in Quick Settings and tap it.
- Toggle whether you want to Record audio or Show touches on screen.
- Tap Start.
- When you’re done recording, swipe down, then tap Tap to stop.
- You can find your finished screen recording in the Photos app. (Check the Library > Movies folder.)
Pro Tip: If you only need to take a screenshot on Android, hold the power and volume down buttons simultaneously.
What’s the Best Screen Recorder?
Once you know how to how to screen record on your computer, you can capture just about anything you want to show. When it comes to tools, built-in screen recorders generally get the job done. But if you want to make professional-quality screen recordings, you’ll have to step up to a more powerful tool.
Looking for a better screen recorder for your business (whether free or paid)? Check out our post on the best screen recorders.
This post was originally published on October 1, 2019. It was updated on January 31, 2024.

")

